
Table of Contents
- Profile
- Question 1: How do I create a profile in iLead?
- Question 2: Who sees my information?
- Question 3: Why can’t I login? Or Why is my iLead registration incomplete?
- Question 4: How do I use the “Communicate” section?
- Question 5: What is the “Find Me Online” section?
- Question 6: Why should I add the optional information to my profile?
- Engagement/Badges & Rewards
- Question 1: How do I earn a badge?
- Question 2: Where do I receive a badge?
- Question 3: How do I share my badges with others online?
- Question 4: How do I find out more information about the awarded badge?
- Question 5: Where do I find my reward?
- Forum
- Question 1: How do I post to a forum
- Question 2: Where can I find all of my available forums?
- Question 3: There has been no response to an important forum question. How can I help return people’s attention to this posted topic?
- Event
- Question 1: How do I find my event invitations?
- Question 2: How do I RSVP for an event? Who sees this?
- Question 3: I have questions and/or information for an upcoming event. Where is the correct place to share this?
- Question 4: Can I create an event?
- Attendance
- Question 1: Where do I see my attendance for a course?
- Question 2: How do I provide an excused absence?
- Question 3: Can a teacher change my attendance after the class is completed?
- Question 4: Can I make-up a class date that I missed?
- Question 5: What if my attendance isn’t correct?
- Portfolio
- Question 1: Where are my Portfolios?
- Question 2: What is an active Portfolio?
- Question 3: How do I upload items to a Portfolio?
- Question 4: Why do I set private and/or public when uploading Portfolio items?
- Question 5: How do other iLead users find new items I’ve uploaded to a public portfolio?
- Service Tracking
Profile
Profile Overview: To join and participate in New Look’s iLead platform, you must register and identify require profile information. The profile page also serves as your personal community page within iLead.
Question 1: How do I create a profile in iLead?
- Step 1 – Log In. Find “Manage Users” (tool bar at top). Click.
- Step 2 – Click “Create User” (near top of page)
- Step 3 – Enter Information
- Mandatory Profile Fields include: Must complete all 6 in order to successfully register user
- First Name
- Last Name
- Email Address
- City, State
- Country
- Select Yes or No to receive emails
- Optional Profile Fields include:
- Mobile Phone
- School/Company
- Grade
- Birth Date
- Gender
- Ethnicity
- Employer
- Customizable Fields include:
You do NOT have to complete these, but it is highly recommended. (See Pro Tip below.)
- Profile Public/Private setting (peers can only see users if profile is Public)
- Mobile Phone (no one sees this information – it’s only used to communicate through the “Communicate With Me” tool)
- School/Company
- City, State, Country
- Grade
- Photo Image (you can import this from social sites like Facebook and LinkedIn)
- About Me (write this in 280 characters; this can be updated)
- Communicate With Me (gives you options to communicate via program chat, text message, and email)
- Find Me Online Here (add links to your Social Media! Options include: Tumblr, Blog URL, Twitter, Facebook, LinkedIn, MySpace, SoundCloud)
- Track My Service
- Step 4 – Press “Save”
Screenshot:
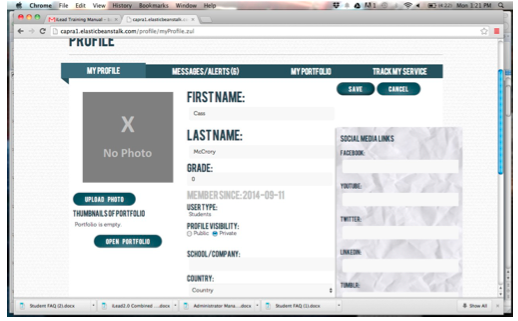
Question 2: Who sees my information?
When you make your Profile Public, all Users, Administrators, and Managers can see your information. If you do not make your Profile Public, then Users cannot see your information.
Question 3: Why can’t I login? Or Why is my iLead registration incomplete?
You cannot login or your iLead registration is incomplete when the Mandatory Profile fields from above are incomplete or not saved.
Question 4: How do I use the “Communicate” section?
The “Communicate” section is so you can message through iLead and so other Users can contact you via the information you provide, such as email, telephone, and other Social Media options. Certain information is kept private. Sections include:
- Mobile Phone (no one sees this information – it’s only used to communicate through
- Communicate With Me (gives you options to communicate via program chat, text message, and email)
- Find Me Online Here (add links to your Social Media! Options include: Tumblr, Blog URL, Twitter, Facebook, LinkedIn, MySpace, SoundCloud)
Question 5: What is the “Find Me Online” section?
This is where you can add links to your Social Media. Options include: Tumblr, Blog URL, Twitter, Facebook, LinkedIn, MySpace, and SoundCloud.
Question 6: Why should I add the optional information to my profile?
Add optional information such as “Find Me Online”, “Photo Image” & “About Me” to communicate with your peers through iLead. You can help grow awareness for all the great activities and service New Look provides to its community.
Engagement/Badges & Rewards
Engagement Overview: Badges & rewards will be distributed automatically for your accomplishments & service within New Look. Badges can also be shared across your wider online communities.
Question 1: How do I earn a badge?
To earn a badge you must possess at least 1 qualification for this badge. Qualifications can include:
- Course % Completion
- Attendance
- Years of Service
- Years of participation
- Write in options.
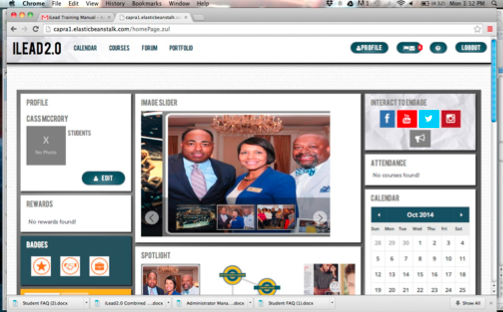
Question 2: Where do I receive a badge?
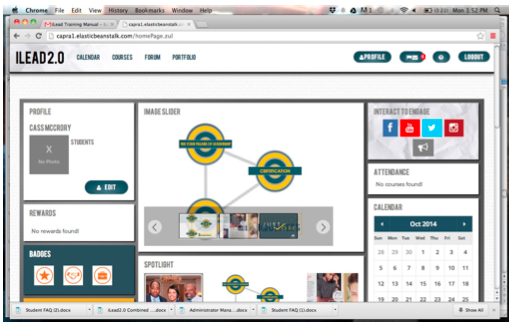
Badges appear on your Dashboard.
Screenshot:
Question 3: How do I share my badges with others online?
- Step 1 – Go to Dashboard
- Step 2 – Scroll down to “Badges.” Click on Badge you’d like to share.
- Step 3 – Click “Share on Social Site”
Screenshot:
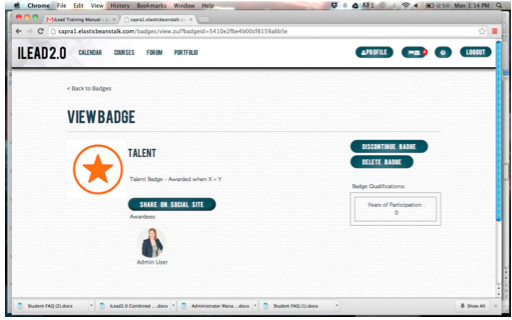
Question 4: How do I find out more information about the awarded badge?
Click on the icon that appears on your Dashboard. This will explain information such as the Qualifications you possessed in order to earn it.
Question 5: Where do I find my reward?
On your Dashboard between Badges and Profile. (See 1 st Screen shot.)
PROTIP: Let your family & friends see your New Look accomplishments by sharing your awarded badges through your preferred social channels.
Forum
Forum Overview: The iLead forums can serve as a primary communication tool between New Look organization, volunteers and students. Allowing users to post messages and comments on other messages. And learning-focused question/answers, quizzes, and survey for specific topics and courses.
Question 1: How do I post to a forum
- Step 1 – Log In. Find “Forum” (tool bar at top). Click.
- Step 2 – Select Forum you would like to participate in. Click.
- Step 3 – Enter Information/Answer Questions.
Screenshot:
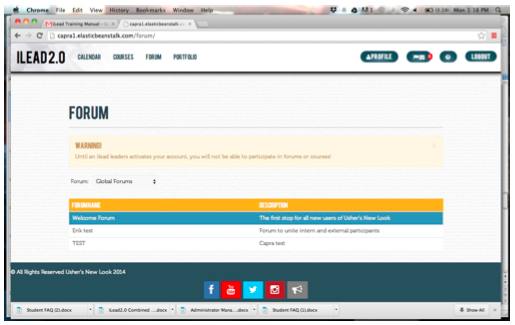
Question 2: Where can I find all of my available forums?
- Step 1 – Log In. Find “Forum” (tool bar at top). Click.
Here you will see a list of the forums that are available to you.
Question 3: There has been no response to an important forum question. How can I help return people’s attention to this posted topic?
Event
Event Overview: Students can find invitations to attend New Look events that increase their participation, education and service with New Look.
Question 1: How do I find my event invitations?
When a User is invited to an Event, date becomes circled on User’s Calendar (in dashboard). You can find Event Invitations in a couple of different places:
- Calendar (so that you can RSVP: Yes – Maybe – No)
- Moodle message area
- Email or text depending on your Communication settings
- User has the option to RSVP: Yes – Maybe – No
Question 2: How do I RSVP for an event? Who sees this?
Go to the Calendar on your Dashboard. Look for the event and RSVP here: Yes – Maybe – No.
- You can make this response Public so that all Users can see it.
- Or, you can keep the response private so that only Event Administrators or Managers can see it.
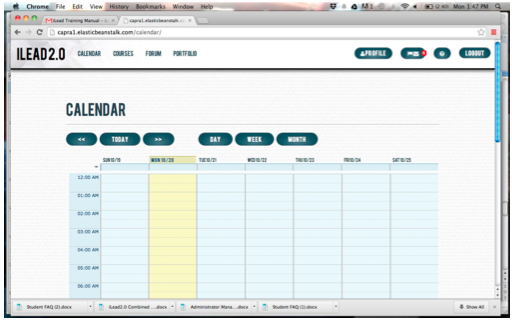
You can also Click “Calendar” on the top toolbar of your Dashboard. The following page will appear:
Screenshot:
Question 3: I have questions and/or information for an upcoming event. Where is the correct place to share this?
Question 4: Can I create an event?
No. Only Administrators and Managers can create events.
PRO TIP: Setup your personal communications to include an email or text message, for faster invitations and information for your New Look events.
Attendance
Attendance Overview: For many of the in-person courses offered by New Look the primary gauge of success is a students attendance in the class. For that reason you’ll want to make sure that your attendance is recorded accurately.
Question 1: Where do I see my attendance for a course?
Attendance can be found on your Dashboard, on the top right side.
Screenshot:
Question 2: How do I provide an excused absence?
Question 3: Can a teacher change my attendance after the class is completed?
Question 4: Can I make-up a class date that I missed?
Question 5: What if my attendance isn’t correct?
Portfolio
Portfolio Overview: Portfolio is the location where all of your documents are stored within iLead. This includes: Individual Portfolio for user items, Course Portfolio to manage materials & uploads, and Events Portfolio for images and media added.
Question 1: Where are my Portfolios?
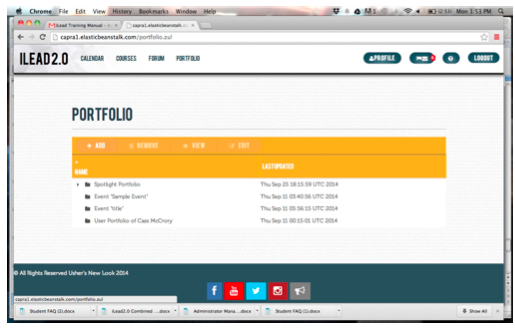
Portfolios are located in you Dashboard in the upper toolbar. Once you click on “Portfolio,” the following screen appears:
Question 2: What is an active Portfolio?
Portfolio is the ‘folder’ location for all documents being stored within iLead. This includes:
- Individual Portfolio for a user’s items
- Course Portfolio to manage materials & uploads
- Events Portfolio for images and media added
- Administrator’s Badges Portfolio for collection of all badges
- Spotlight Portfolio for highlighting content in dashboard across all users.
Question 3: How do I upload items to a Portfolio?
- User – can add to a Portfolio in the following ways:
- On their Profile Portfolio page
- On the Course page
- On the Event page when they are an attendee of that event
- When a User clicks the Upload to this Portfolio link a pop-up window comes up with these fields
- Browse to upload or insert a URL to the location of the item online.
- A thumbnail image is automatically brought to the screen once uploaded and the user can update that thumbnail manually by cropping and scaling the image or upload an image for the thumbnail to display.
- Portfolio Item Title
- Portfolio Item Description
- Public/Private switch on each Portfolio item.
Question 4: Why do I set private and/or public when uploading Portfolio items?
Users can View and Edit Portfolio items from their Profiles and the main navigation. When editing they have the option to upload a new file, upload a new thumbnail, change status Public/Private or Delete item.
- Items marked Public can be viewed by all Users and have a Like and Comment option. (Similar to Facebook.) Administrators/Managers and User’s can delete Comments made by a third party.
- Items uploaded and marked as Public will appear in the Activity Stream if that module is on that organizations Dashboard.
Question 5: How do other iLead users find new items I’ve uploaded to a public portfolio?
Portfolio Page – The Portfolio Page can be viewed in the following ways:
- My Portfolio – Thumbnail view of all Portfolio items
- Spotlight Portfolio – Thumbnail view of all items in the Spotlight Portfolio with those item “active” in the Dashboard rotation appearing first.
- Active Portfolios – Thumbnail view of all Portfolios the User has access to
- All Portfolios – List view of all Portfolios the User has access to and ability to sort on date updated and name
PROTIP: Upload new items to your public Portfolios for greater engagement and communication in organization. Would you like people to attend your upcoming event? Create a dynamic graphic banner or relevant content that can be shared to support interest within your New Look community.
Service Tracking
Question 1: How do I get started to track my New Look service?
Within all Administrators’, Managers’ & Users’ Profiles.
- My service goal – this is an optional item that the User can set a Service goal of x Hours within x time frame and a progress indicator shows on their Track My Service Page.
- My service hours – demonstrated with a number and hourglass icons
- Log Service button
Question 2: There are many different kinds of ways I dedicate service. How do I differentiae these activities?
- How I serve – this is a listing of organizations with which the User serves.
- When adding a new organization to serve with a User can provide: Name of Organization, Mission, Location, Contact Person Name, Email, Phone
- When a User is typing in name auto-fill is pulled from Reporting of previously entered Organizations.
Question 3: How do I update my service time?
- Log Service pop-up
- Drop Down Box – Where I Served…
- The amount of time served (in 15 minute increments)
- A text area to say what they did in that time, contact to validate.
- Track my Service button.
- When a User clicks the Track My Service button a message gets sent to the User’s manager to validate the service
- On the Track my Service Page the following information is contained:
- How I serve – this is a listing of organizations with which the User serves.
- When adding a new organization to serve with a User can provide: Name of Organization, Mission, Location, Contact Person Name, Email, Phone
- When a User is typing in name auto-fill is pulled from Reporting of previously entered Organizations.
- How I serve – this is a listing of organizations with which the User serves.
Question 4: How is my service time validated?
The Manager has a button to validate the service and the User will then get “credit” for that service and it appears on their profile & on their Dashboard.
PROTIP: Set service goals! And raise the bar for your service time and what you can achieve within New Look.
Leave a Reply
Want to join the discussion?Feel free to contribute!