
Table of Contents
- Profile
- Question 1: How do I qualify new users?
- Question 2: How do I register students en masse?
- Question 3: How do I manually create a profile for new user?
- Question 4: What is user’s rank? How is that set?
- Question 5: Does it matter which authentication engine users sign-up?
- Question 6: What are the mandatory profile fields? And what happens if a user does not fully complete them?
- Question 7: How do I edit or delete user information in iLead?
- Engagement/Badges & Rewards
- Question 1: Question 1: How do I create a badge?
- Question 2: What are badge qualifications? And how many are needed when creating a badge?
- Question 3: How do I award a student a New Look badge?
- Question 4: How do I find a list of all profiles that have been awarded a badge?
- Question 5: How are badges shared via Social (Media) Channels?
- Question 6: Can you edit or delete, an existing badge?
- Question 7: What’s the ideal number of badges?
- Question 8: How do I add a reward to a badge?
- Forum
- Question 1: How do I create a forum topic?
- Question 2: What are the functions of a forum?
- Question 3: How do I create a quiz, Q&A, survey, or contest within a forum?
- Question 4: How do I associate a forum with a specific course?Where do I find a list of forums my students are participating in?
- Question 5: Where do I find a list of forums my students are participating in?
- Question 6: How do I monitor a forum?
- Question 7: What are the privacy settings for a public or private forum in iLead?
- Event
- Question 1: How do I create a new event?
- Question 2: How do I invite people to an online event? What setup is needed for a virtual location?
- Question 3: Can I set reminders for the created event?
- Question 4: How do I edit a created event?
- Question 5: Can I track who has RSVP’d for an event?
- Question 6: How do I a forum for a specific invite? What expectations should we have for these event forums?
- Question 7: As a manager, how do I extend invitations to students in New Look outside of my local charter or course?
- Attendance
- Question 1: How do I mark a student as attended?
- Question 2: How do I mark a student as excused from a course?
- Question 3: How do I mark a student as a non-excused absence?
- Question 4: Can I change the status of a previous days attendance?
- Question 5: What do I put in the text notes?
- Reporting
- Question 1: How do I view a multi-course or multi-user report?
- Question 2: How do I set filters for a report?
- Question 3: How do I save a report?
- Question 4: How do I print a report?
- Portfolio
- Question 1: How do I create a new Portfolio?
- Question 2: Where are my Portfolios?
- Question 3: How do I upload new items to an existing Portfolio?
- Question 4: What kinds of media and documents can be uploaded for Portfolios?
- Question 5: What are the expectations when setting private and/or public for Portfolio items?
- Question 6: How can I better organize an existing Portfolio?
- Question 7: Why are Badges considered a Portfolio?
- Question 8: How do I create a Spotlight Portfolio? Who sees it?
- Question 9: How can we sunset Spotlight Portfolio items?
- Service Tracking
- Question 1: How do I get started to track my New Look service?
- Question 2: There are many different kinds of ways I dedicate service. How do I differentiate these activities?
- Question 3: Do I setup an individual user’s service tracking within iLead?
- Question 4: How do I validate a user’s service?
- Question 5: How do I know when a user’s service requires my validation?
- Question 6: How do I track my own service time?
- Question 7: As a manager how is my service time validated?
Administrator/Managers
Profile
For iLead platform security & authentication, new users must register and identify required profile information. The profile page serves as each individual user’s personal community page within iLead.
Expectation: Managers will ensure the correct registration of new students into platform. Utilizing the profile tool for paperless on-boarding and registering students en masse when needed. And also providing on-going management and updating of student’s profiles.
Question 1: How do I qualify new users?
When a new user registers they will automatically have access to the dashboard and information available to the public. In order for a new registrant to get access to course materials they will need to be enrolled in a course.
Question 2: How do I register students en masse?
- Step 1 – Log In. Find “Manage Users” (tool bar at top). Click.
- Step 2 – Click “Import Users from CSV” (near top of page)
- Step 3 – Users must have: First Name, Last Name, Email Address fields completed
(It is optional to include: Mobile Phone, School/Company, City, State, Country, Grade)
Question 3: How do I manually create a profile for new user?
There are 2 ways Administrators can do this-
Option 1:
- Step 1 – Log In. Find “Mange Users” (tool bar at top). Click.
- Step 2 – Click “Create User” (near top of page)
- Step 3 – Enter Information
- First Name, Last Name, Email
- Under “Type,” use dropdown menu to select “Students”
- Select “Create User”
- Step 4 – Confirmation
- Look for, “Thank You for Registering”
Option 2:
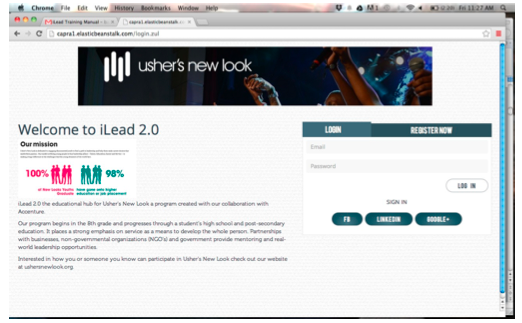
- Step 1 – Do not Log In. Click “Register Now” tab instead.
- Step 2 – Enter Information
- First Name, Last Name, Email
- Under “Type,” use dropdown menu to select “Students”
- Select “Create User”
- Step 3 – Confirmation
- Look for, “Thank You for Registering”
Option 2 Screen Shot:

Question 4: What is user’s rank? How is that set?
Question 5: Does it matter which authentication engine users sign-up?
- Authentication Engines – Users can sign-in using:
- Username and Password – created for iLead 2.0
Screenshot:
Question 6: What are the mandatory profile fields? And what happens if a user does not fully complete them?
- Mandatory Profile Fields include: Must complete all 6 in order to successfully register user
- First Name
- Last Name
- Email Address
- City, State
- Country
- Select Yes or No to receive emails
- Optional Profile Fields include:
- Mobile Phone
- School/Company
- Grade
- Birth Date
- Gender
- Ethnicity
- Employer
- Customizable Fields include:
You do NOT have to complete these, but it is highly recommended. (See Pro Tip below.)
- Profile Public/Private setting (peers can only see users if profile is Public)
- Mobile Phone (no one sees this information – it’s only used to communicate through the “Communicate With Me” tool)
- School/Company
- City, State, Country
- Grade
- Photo Image (you can import this from social sites like Facebook and LinkedIn)
- About Me (write this in 280 characters; this can be updated)
- Communicate With Me (gives you options to communicate via program chat, text message, and email)
- Find Me Online Here (add links to your Social Media! Options include: Tumblr, Blog URL, Twitter, Facebook, LinkedIn, MySpace, SoundCloud)
- Track My Service
Question 7: How do I edit or delete user information in iLead?
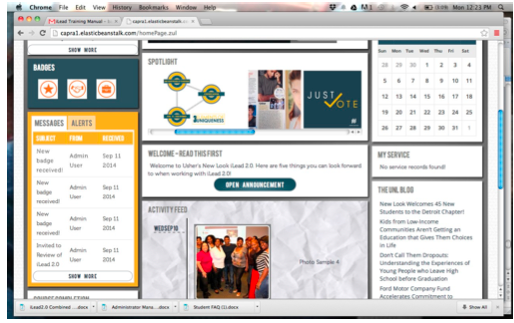
- Administrators and Users Steps to Edit Profile Information:
- Step 1 – Go to Dashboard
- Step 2 – Click “Edit” near the profile picture
- Step 3 – Click “Edit Profile” near the top right hand of the page
- Step 4 – Add, Edit, Delete any information. Click Save.
- Administrators can manage User Profiles in the following way:
- Approve registration
- Revoke Public Profile
- Set User’s Rank
- Set Supervisor Name
- Modify Attendance Records at a User level
- Award Badges
- Modify Member Since x date
- HIDE Option on Attendance so this is not public
- HIDE Option on Course Completing Indicators so this is not public
- Administrators can manage Manager and User Profiles in the following way:
- Promote User to Manager or Administrator
- Edit any User
- Delete User
- Import .csv of bulk users
Steps 1 & 2: Screen Shot of Dashboard

PRO TIP: Encouraging your students to engage with the optional profile fields information like adding “Find Me Online”, “Photo Image” & “About Me” spreads social communication in iLead. And can help grow awareness for all the good activities and service New Look is providing to its community.
Engagement/Badges & Rewards
Engagement Badges & Rewards are created to identify the accomplishments of qualified students. Digital badges & rewards will be distributed to students via messages.
Expectation: Managers will correctly update qualifications and award students. Administrators will create new badges and rewards that meet the organization’s qualifications.
Question 1: How do I create a badge?
Badges can be created by Administrators, only. (Badges can be awarded by Administrators or Managers.)
- Creating Badges
- Step 1 – Find “Badges” (tool bar at top). Click.
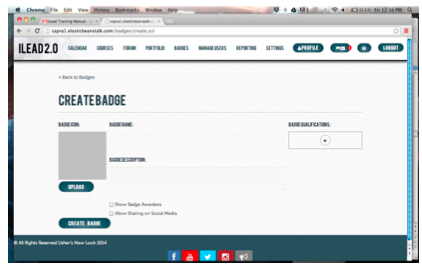
- Step 2 – Select “Create Badge” (near bottom left of page).
- Step 3 – Upload Badge, Add Badge Name, Add Badge Description, Add Badge Qualifications
- Badge Name – 50 character limitation
- Badge Image – 150x150px limitation
- Step 4 – OPTIONAL: You can select to “Show Badge Awardees” and/or “Share this Badge on Social Media”
- Step 5 – Click “Create Badge” button (near bottom of page)
Question 2: What are badge qualifications? And how many are needed when creating a badge?
- Badge Qualifications
- Badge Qualifications – Qualifications can include: Course % Completion, Attendance, Years of Service, Years of participation, write in options.
- Number of Qualifications Needed
- Add at least 1 qualification.
- Add more than 1 qualification using +/- structure or AND/OR logic between items.
Screenshot:
Question 3: How do I award a student a New Look badge?
- The Award Badges Page has the following properties:
- There is a headline of: Award a Student a Badge
- Step 1- Select Student
- Step 2- Select Badge
- Step 3- Confirm the User has the Qualifications to receive that Badge. (Only an Administrator can over-ride and still award the Badge.)
- There is a second headline of: Identify Qualified Students for Badges
- Step 1- Select the Badge
- Step 2- Show students who have met technical requirements of receiving this Badge
- Step 3- Select individual student or multiple students to Award Badge
- There is a headline of: Award a Student a Badge
- This is what happens when Users receive Badges:
- A message will be sent to Users within the Moodle environment.
- User will also receive a text or email alert of they are set up to do so
- Users with Public Profiles will see a Badge alert in their Activity Feed. (This can be liked, commented on by other Users.)
- Badges multi-media item is only un-locked by those that have received that Badge.
- Badges are prominently displayed on the Dashboard.
- User’s Badges and Achievements – when clicked the Badges go to a Badge detail page that contains information on what that Badge was awarded for, steps the User took to earn it and the bonus multi-media item that they received (only users who have earned the badge can play the multi-media item), Thumbnail Profile Images of all those students that earned that Badge.
Question 4: How do I find a list of all profiles that have been awarded a badge?
- Badge Awardees (Step 4 from Q2) – Select Box
- Show Badge Awardees – Lists profiles and profile picture of all Users who have been awarded this badge. (Only for Public Profiles.)
Question 5: How are badges shared via Social (Media) Channels?
- Badges & Social Media (Step 4 from Q2) – Select Box
- Share this Badge on Social Media – Lets Users share the badge award if they have been awarded the badge. Lets Users who have not been awarded the badge share the intention of the badge.
Question 6: Can you edit or delete, an existing badge?
- Delete a Badge – You can delete a badge awarded to a User. It no longer shows up in the history.
- Discontinue this Badge – The award remains for Users who already have it, but the badge cannot be awarded in the future.
Question 7: What’s the ideal number of badges?
- Ideal Number of badges: 6-8/year
Question 8: How do I add a reward to a badge?
PROTIP: Create dynamic badges & rewards for students. Take this opportunity of success to tell your best possible brand story. Give the students something they are proud to receive & share online with their friends/family. Growing awareness within the greater community for the good service & education New Look provides.
Forum
The iLead forums can serve as a primary communication tool between New Look organization, volunteers and students. Allowing users to post messages and comments on other messages. And learning-focused question/answers, quizzes, and survey for specific topics and courses.
Expectation: Managers will monitor and keep discussion focused with informative discussion. They will work to grow and retain engagement around course & activity discussions.
Question 1: How do I create a forum topic?
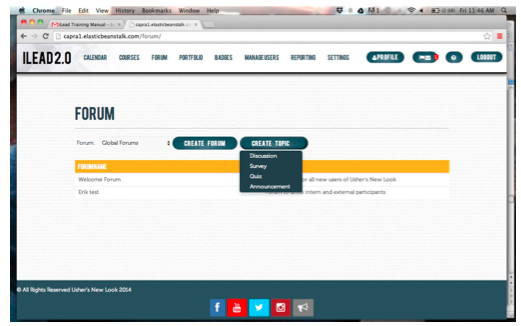
- Step 1- Log In. Find “Forum” (tool bar at top). Click.
- Step 2 – Select “Create Topic”
- Step 3 – Select Topic. Choose from:
- Discussion
- Survey
- Quiz (multiple choice)
- Announcement
Screenshot:
Question 2: What are the functions of a forum?
- Functions of the forum: (should these align with: quiz, Q&A, survey, or contenst??)
- Discussion Board
- Contests
- Question & Answer
- Tree-like architecture
Question 3: How do I create a quiz, Q&A, survey, or contest within a forum?
Steps 1-5 for Quiz, Q&A, Survey, and Contest are all the same except that Step 3 changes depending on which selection you choose.
- Quiz
- Step 1- Log In. Find “Forum” (tool bar at top). Click.
- Step 2 – Select “Create Topic”
- Step 3 – Choose “Quiz”
- Step 4 – Include a Title and a Message
- Step 5 – OPTIONAL: Make the topic Private and/or Prevent Replies
- Step 6 – Create the Quiz manually or by uploading a Word.doc
For Manual Creation:
- Click “Add Question”
- Select: “Open Question,” “Choose from a List,” and/or “Multiple Choice”
- Open Question – “Enter Question” and “Enter Answer” in spaces where this prompt appears
- Choose from a List and Multiple Choice – “Enter a Question” and “Add Options” as your multiple choice selections. (See Survey, Step 6 below for more detail.)
- Step 7 – Press “Create”
Screenshot:

- Q&A (Is this the same as Discussion?)
- Step 1- Log In. Find “Forum” (tool bar at top). Click.
- Step 2 – Select “Create Topic”
- Step 3 – Choose “Discussion”
- Step 4 – Include a Title and a Message
- Step 5 – OPTIONAL: Make the topic Private and/or Prevent Replies
- Step 6 – Press “Create”
- Survey
- Step 1- Log In. Find “Forum” (tool bar at top). Click.
- Step 2 – Select “Create Topic”
- Step 3 – Choose “Survey”
- Step 4 – Include a Title and a Message
- Step 5 – OPTIONAL: Make the topic Private and/or Prevent Replies
- Step 6 – Create the Survey manually or by uploading a Word.doc
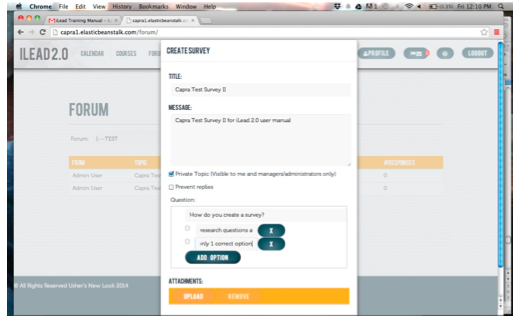
For Manual Creation :
- Type survey question where it says, “Enter Question”
- Create multiple choice answers by clicking “Add Option”
- Type multiple choice answer where it says, “Enter Label for Option and press “Add Option.”
- Repeate above steps as necessary.
- Step 7 – Press “Create”
Screenshot:
- Contest (I don’t see this as an option)
Question 4: How do I associate a forum with a specific course?
Question 5: Where do I find a list of forums my students are participating in?
Question 6: How do I monitor a forum?
Question 7: What are the privacy settings for a public or private forum in iLead?
Event
Managers & Administrators have the ability to create an event in iLead. For the easiest way to publicize and organize upcoming in-person & online activities directly for the New Look students..
Expectation : Managers will create events that have relevancy to New Look community. Fostering both local & national charter growth within the organization.
Question 1: How do I create a new event?
Administrators and Managers create events
- Step 1 – I do not see an “Event” button/tab
- Step 2 – Add:
- Event Title – 100 Character Limitation
- Event Date
- Event Location – with Google Map pop-up option or Google Hangout
- Event Details – Open long form Text box.
- Event Image – cover photo for Facebook Events – esque
- Public RSVP
- Reminders – check-box to allow multiple selections
- 1 week
- 1 day
- 1 hour
- 15 minutes
- 5 minutes
- Invitees Mandatory (can be noted as optional)
- Administrators – All names, All Courses, Filter Options (ie Atlanta)
- Managers – Responsible users, courses, filter options
Question 2: How do I invite people to an online event? What setup is needed for a virtual location?
Question 3: Can I set reminders for the created event?
Yes. Reminders – check-box to allow multiple selections
- 1 week
- 1 day
- 1 hour
- 15 minutes
Question 4: How do I edit a created event?
Event Page – Administrators have the ability to edit any event.
- HOW?
Question 5: Can I track who has RSVP’d for an event?
- Event Invitation – If you have made the RSVP public, you can see the User response publically. Administrators and Managers can see all parties that have RSVP’d to the event.
- Users receive invitation in the Moodle messages area
- Users receive email or text message depending on Communication settings
- User has the option to RSVP: Yes – Maybe – No
Event Indicator on Calendar – Users can track their invites.
- When a User is invited to an Event, date becomes circled on User’s Calendar (in dashboard)
Question 6: How do I a forum for a specific invite? What expectations should we have for these event forums?
- Administrators can create a Forum tied to the event
- That forum can be a question & answer
- That forum can also be a traditional discussion board forum
Question 7: As a manager, how do I extend invitations to students in New Look outside of my local charter or course?
Attendance
For many of the in-person courses offered by New Look the primary gauge of success is a student’s attendance in the class. For that reason, tracking attendance accurately and in a timely way is necessary. Students have access to see their attendance reports as they are submitted – staying on-top of this is a key component to students seeing the importance of the iLead destination.
Expectation : Managers of courses will mark attendance within 24 hours of the class completion.
Question 1: How do I mark a student as attended?
Administrators & Managers my track student attendance. (Managers will only see Courses where they are marked as a Manager.)
- Once a Course is created that Course will appear on the Attendance tracking page for all Administrators.
- The Attendance Tracking page does have standard filtering options – Date Course Created, Alpha Order, Location, Grade, School.
- Step 1 – Click Course Name (to open Course Module)
- Step 2 – Course Module will have a tab for the course details, course materials, course related Portfolio uploads, course attendance.
- Step 3 – Course Attendance will list all students enrolled in that class and will show the most recent course date as default. Navigate using forward and back arrows for different dates where the Calendar has been populated.
- Step 4 – Manually check attendance and note students on a slide:
- Attended – Excused Absence – Non-Excused Absence.
- The default status will be Non-Excused Absence.
- The manager will be able to add a text note in line with each class attended to provide qualitative feedback.
Question 2: How do I mark a student as excused from a course?
Manually check attendance and note students on a slide: (See Q1 Steps for further instruction.)
- Attended – Excused Absence – Non-Excused Absence.
- The default status will be Non-Excused Absence.
Question 3: How do I mark a student as a non-excused absence?
Manually check attendance and note students on a slide: (See Q1 Steps for further instruction.)
- Attended – Excused Absence – Non-Excused Absence.
- The default status will be Non-Excused Absence.
PRO TIP: Send students with non-excused absences a note via iLead asking them why they were not able to attend or request an excused note from a guardian.
Question 4: Can I change the status of a previous days attendance?
Question 5: What do I put in the text notes?
Text notes can be used for individual students or for the whole class. These notes can be used to track student involvement and accolades or general notes about how that days class went. These text notes can be used to help mold this course in the future. For example you may make a text note that a certain exercise in the class was given 15 minutes to complete but most of the students were finished in 10 minutes. This is valuable feedback on the course.
Reporting
Reporting Overview: Reports are user data points generated around Location, Grade, Service Participation, Course Type & Completion. Reports are only fully accessible to Administrators. With filtered access available to Managers for identified students.
Expectation : Administrators and Managers will view filtered information for specific relevancy, and gain new insights into organization performance and information.
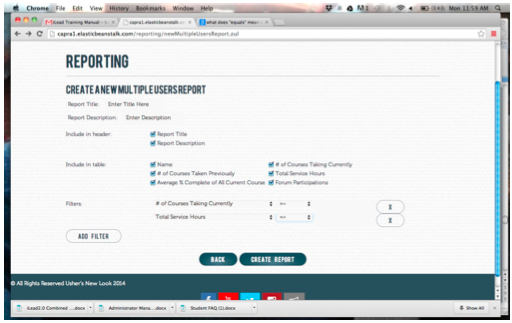
Question 1: How do I view a multi-course or multi-user report?
- There are 2 areas of reporting – Course Reporting & User Reporting – and 4 choices to select from. (Within Course and User Reporting, you can choose “individual” or “multiple.”)
- Any report can be customized, which means you can pick and choose the data you’d like to present.
- Reports can also be filtered, which means you pick and choose how the data is organized (or what ranges of data you’d like to show).
- Multiple Course Reporting allows Administrators and Managers to view information across Courses but filtered on other criteria (such as: Location, Grade, Manager, Course Type).
- Step 1 – Log In. Find “Reporting” (tool bar at top). Click.
- Step 2 – Select from a choice of:
- Individual “Course Report,” “Multiple Course Report,” “Individual User Report,” “Multiple Users Report.” Press Next.
- Step 3 – Customize the Report.
- Decide what should be in the Header and the Table (Data):
- Header Area
- Report Title
- Number of Courses
- Data Area
- Course Title
- Manager
- % complete of the course
- Average % complete of all Users
- # of Portfolio Items
- Average % of events attended
- Average Grade
- Step 4 – Filter the Report (if necessary).
- “Add Filter” if necessary. Select the criteria. (You can add more than one.)
- Select the Filter for each criteria:
- Equals – includes just 1 exact search parameter (i.e. 85%)
- Contains – includes all search parameters in this field (i.e. 13-18)
- > – Includes figures greater than the search parameter (i.e. 85% to yield B+ or higher)
- >= – Includes figures greater than or equal to the search parameter
- < – Includes figures less than the search parameter (i.e. 85% to yield B or lower)
- <= – Includes figures less than or equal to the search parameter
- Step 5 – “Create Report” to complete. (Press “Back” only to go back to Step 2.)
Question 2: How do I set filters for a report?
- Step 1 – Log In. Find “Reporting” (tool bar at top). Click.
- Step 2 – Select from a choice of:
- Individual “Course Report,” “Multiple Course Report,” “Individual User Report,” “Multiple Users Report.” Press Next.
- Step 3 – Customize the Report.
- Decide what should be in the Header and the Table (Data):
- Header Area
- Report Title
- Number of Courses
- Data Area
- Course Title
- Manager
- % complete of the course
- Average % complete of all Users
- # of Portfolio Items
- Average % of events attended
- Average Grade
- Step 4 – Filter the Report (if necessary).
- “Add Filter” if necessary. Select the criteria. (You can add more than one.)
- Select the Filter for each criteria:
- Equals – includes just 1 exact search parameter (i.e. 85%)
- Contains – includes all search parameters in this field (i.e. 13-18)
- > – Includes figures greater than the search parameter (i.e. 85% to yield B+ or higher)
- >= – Includes figures greater than or equal to the search parameter
- < – Includes figures less than the search parameter (i.e. 85% to yield B or lower)
- <= – Includes figures less than or equal to the search parameter
- Step 5 – “Create Report” to complete. (Press “Back” only to go back to Step 2.)
Screenshot:
Question 3: How do I save a report?
Question 4: How do I print a report?
- Reports can be viewed on screen or exported to a .csv file or PDF. When printing the Header of the page is replicated on each page.
PRO TIP: Gain more insight from reports by utilizing data points across multiple fields. Including: The ability to view the total number of participating in all of iLead’s Forums. The total number of students currently taking a New Look course. Or the student’s completion % for a given course.
QUESTION: Is there a way to see the year that the student is taking the course? Monthly progression?
Portfolio FAQ Questions
Portfolio Overview: Portfolio is the ‘folder’ location for all documents being stored within iLead. This includes: Individual Portfolio for a user’s items, Course Portfolio to manage materials & uploads, Events Portfolio for images and media added, and Administrator’s Badges Portfolio for collection of all badges & Spotlight Portfolio for highlighting content in dashboard across all users.
Expectation : Managers of courses will create and maintain an organization of documents with Portfolios for individual users, courses, and events. Administrators will also regularly select overall platform Portfolio content to display on the dashboard spotlight for all users.
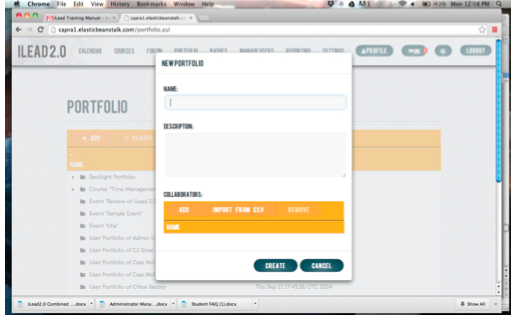
Question 1: How do I create a new Portfolio?
Creating a Portfolio
- Portfolios are created automatically for each course and event. Administrators do have the ability to create Portfolios manually.
- Step 1 – Log In. Find “Portfolio” (tool bar at top). Click.
- Step 2 – Click “Add” (near top of page). Then click:
- Portfolio
- Folder
- Item
- Step 3 – Import from .csv or Add:
- Name
- Description
- Collaborators
- Step 4 – Press” Create”
Screenshot
Question 2: Where are my Portfolios?
Portfolio Page – The Portfolio Page can be viewed in the following ways:
- My Portfolio – Thumbnail view of all Portfolio items
- Spotlight Portfolio – Thumbnail view of all items in the Spotlight Portfolio with those item “active” in the Dashboard rotation appearing first.
- Active Portfolios – Thumbnail view of all Portfolios the User has access to
- All Portfolios – List view of all Portfolios the User has access to and ability to sort on date updated and name
Question 3: How do I upload new items to an existing Portfolio?
Adding to Portfolio
- Administrator & Manager – can add to a Portfolio in the following ways:
- On their Profile Portfolio page
- On the Course page
- On the Event page when they are an attendee of that event
- Administrators / Managers can view all Portfolio items uploaded by their associated Users.
- Administrators / Managers can delete items from Portfolio or mark Private. Only the person that uploaded an item can change a Private status to Public.
- Administrators can add Portfolio items to the Spotlight Portfolio by clicking the “Add Item to Spotlight” button.
- User – can add to a Portfolio in the following ways:
- On their Profile Portfolio page
- On the Course page
- On the Event page when they are an attendee of that event
- When a User clicks the Upload to this Portfolio link a pop-up window comes up with these fields
- Browse to upload or insert a URL to the location of the item online.
- A thumbnail image is automatically brought to the screen once uploaded and the user can update that thumbnail manually by cropping and scaling the image or upload an image for the thumbnail to display.
- Portfolio Item Title
- Portfolio Item Description
- Public/Private switch on each Portfolio item.
Question 4: What kinds of media and documents can be uploaded for Portfolios?
Question 5: What are the expectations when setting private and/or public for Portfolio items?
Users can View and Edit Portfolio items from their Profiles and the main navigation. When editing they have the option to upload a new file, upload a new thumbnail, change status Public/Private or Delete item.
- Items marked Public can be viewed by all Users and have a Like and Comment option. (Similar to Facebook.) Administrators/Managers and User’s can delete Comments made by a third party.
- Items uploaded and marked as Public will appear in the Activity Stream if that module is on that organizations Dashboard.
Question 6: How can I better organize an existing Portfolio?
Administrators / Managers can create Child-Portfolios to better organize contents within a Portfolio. This would be leveraged predominantly within courses to organize assignments.
- Administrators / Managers can create a Child-Portfolio within a Portfolio page by clicking “Add a section to this Portfolio”
- When creating a Child-Portfolio within a Portfolio the following fields are collected: Section Name and Section Detail. All other features of the Portfolio carry in to the Child-Portfolio
Question 7: Why are Badges considered a Portfolio?
Question 8: How do I create a Spotlight Portfolio? Who sees it?
- There is a Spotlight Portfolio that can be added to by Administrators only.
- It displays thumbnails of the contents of this Portfolio on the Dashboard.
- The Spotlight Portfolio is present at all times.
Screenshot
Question 9: How can we sunset Spotlight Portfolio items?
Spotlight Portfolio items have an Archive Button which allows the item to stay in the Spotlight, but no longer be shown in the thumbnail slider on the Dashboard.
PROTIP: Use the Spotlight feature to promote organization & student content within iLead. And remember to grab attention by telling a dynamic story. For example if New Look has a newinternships available with Coca-Cola create a graphic banner that can be displayed in the Spotlight. Also, when promoting for an example a student’s new band or work project.
Service Tracking FAQ Questions
Service Tracking Overview: iLead platform can serve as the primary gauge to recognize any persons committed service on behalf of New Look. Will allow you to track detailed information and validate any user’s dedicated time to organization service. And additionally set goals towards greater service completion.
Expectation: Managers will track service details & validate any relevant user’s time dedicated to the organization.
Question 1: How do I get started to track my New Look service?
Within all Administrators’, Managers’ & Users’ Profiles.
- My service goal – this is an optional item that the User can set a Service goal of x Hours within x time frame and a progress indicator shows on their Track My Service Page.
- My service hours – demonstrated with a number and hourglass icons
- Log Service button
Question 2: There are many different kinds of ways I dedicate service. How do I differentiate these activities?
- How I serve – this is a listing of organizations with which the User serves.
- When adding a new organization to serve with a User can provide: Name of Organization, Mission, Location, Contact Person Name, Email, Phone
- When a User is typing in name auto-fill is pulled from Reporting of previously entered Organizations.
Question 3: Do I setup an individual user’s service tracking within iLead?
- For instances where this is a Manager tracking their time in serving the validation is done by an Administrator.
- For instances where this is an Administrator tracking their time in Serving there is no validation process.
Question 4: How do I validate a user’s service?
Validate Service
- Within a message window the Manager receives a communication that a student has tracked their Service and requires validation.
- The Manager clicks on the link and opens the User’s profile Track My Service tab.
- The Manager has a button to validate the service and the User will then get “credit” for that service and it appears on their profile & on their Dashboard.
Question 5: How do I know when a user’s service requires my validation?
Within a message window the Manager receives a communication that a student has tracked their Service and requires validation.
Question 6: How do I track my own service time?
- Log Service pop-up
- Drop Down Box – Where I Served…
- The amount of time served (in 15 minute increments)
- A text area to say what they did in that time, contact to validate.
- Track my Service button.
- When a User clicks the Track My Service button a message gets sent to the User’s manager to validate the service
- On the Track my Service Page the following information is contained:
- How I serve – this is a listing of organizations with which the User serves.
- When adding a new organization to serve with a User can provide: Name of Organization, Mission, Location, Contact Person Name, Email, Phone
- When a User is typing in name auto-fill is pulled from Reporting of previously entered Organizations.
- How I serve – this is a listing of organizations with which the User serves.
Question 7: As a manager how is my service time validated?
The Manager has a button to validate the service and the User will then get “credit” for that service and it appears on their profile & on their Dashboard.
PROTIP: Set service goals for your users. The parameters of these goals should motivate for greater organization participation and dedication.
Leave a Reply
Want to join the discussion?Feel free to contribute!